School bus route planning is the process of designing efficient, safe, and cost-effective routes for transporting students between their homes and school. It ensures that every eligible student is picked up and dropped off on time, while minimizing travel time, mileage, and costs.
Since the school bus routes are repeated on daily basis, planned routes must be created and sent to the drivers automatically. For this purpose, we propose recurring route planning. Recurring route planning is the process of designing and optimizing transportation routes that are repeated on a regular basis—daily, weekly, or monthly. By leveraging recurring route planning, organizations can improve operational efficiency, reduce fuel consumption, minimize travel time, and ensure consistent service quality. Ultimately, recurring route planning helps businesses balance reliability with flexibility, enabling long-term cost savings and better resource utilization.
This blog post explains how to optimize School Bus Routes in Routin Team.
If you're not a member yet, click here for a free 14-day trial
The process is completed in nine steps.
1.Define your school as a depot. Follow the steps in blog post “How to create a depot?”. Write the name of the school as name of the depot, while creating the depot.
2.Click Recurring Plans on the left side menu.
![]()
3.On Recurring Plans screen click Add New Recurring Plan.
![]()
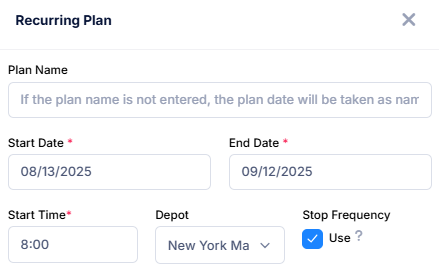
Type the name of the plan. It is useful to write the name of the school and “to school or to home” to state the direction of the route (e.g.Plan Name: East Side Elementary School / home to school). You need to create two distinct plans. One for direction school to home and another for direction home to school. Just create “home to school plan” and then you can copy the plan and reverse the routes easily. Steps for copying route is described in the last step.
Select the beginning and end dates of the school term as start and end dates. Select route starting hour (Start Time). Vehicles will begin picking up students at this time. School start time constraint can be added to the problem, using working hours constraint and route start time. For example, let us assume that vehicles must arrive at the school earlier than 8:45, and routes can start earliest at 7:00. Then we must select route start time as 7:00, and working hours limit as 1 hours 45 minutes. This limit is calculated subtracting 7:00 from 8:45. Working hours limit determined in step 7. Select the school that you have created in step 1 as depot.
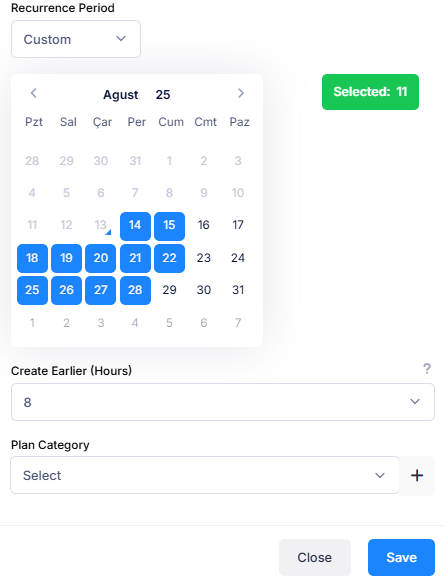
Select school days with Recurrence Period. Select Custom and a calendar will be visible. Click the days that your route will be repeated (school days) on the calendar. You can select multiple days and months. Do not mark “no school days”.
In recurring planning routes are not sent to the drivers manually. System will send the routes to the related drivers automatically for every marked day. All you need to do is selecting the how many hours earlier the routes should be sent. Select the Create Earlier option for this purpose.
Then click Save.
4.The Plan Screen displays three sections. Drivers are displayed on the left, stops are displayed in the middle, and the map is displayed on the right. The school location is marked on the map.
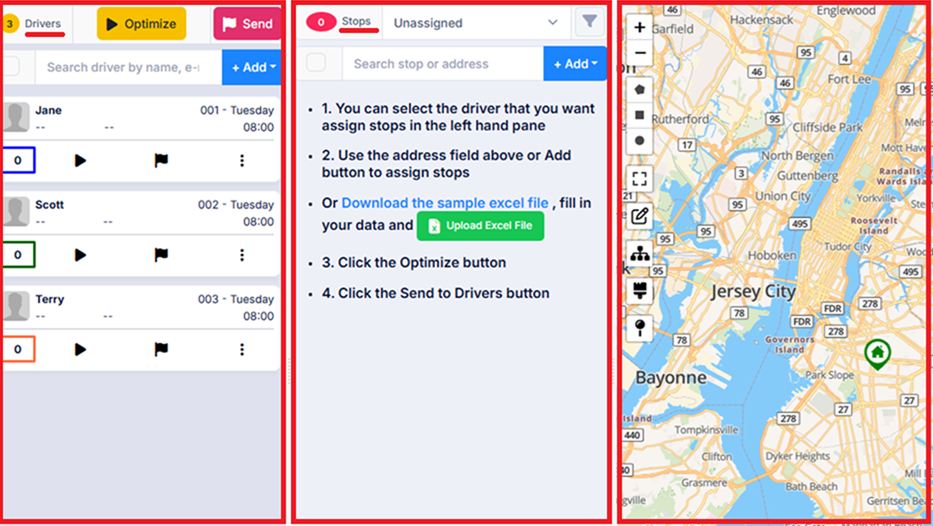
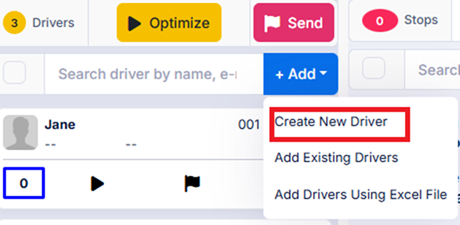
5.Drivers defined for the depot (school) will be automatically added to the plan. To create a new driver, click Add button above the Drivers section, then click the Create New Driver button and define the driver. (For more information, see the blog post "How to create a driver?". Do not forget to add a vehicle with capacity to drivers as explained in the blog post. This will help you for planning with vehicle capacity constraints)
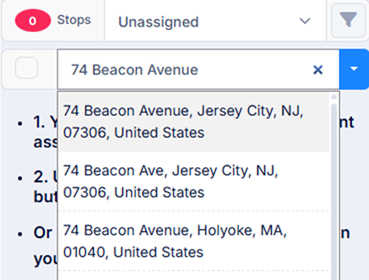
6.Add stops (pick up/drop off locations) for drivers to visit. There are several ways to do this. You can add addresses one by one by entering the address (house number and street/avenue name) in the Address Search field above the Stops section and selecting the address from the options provided.
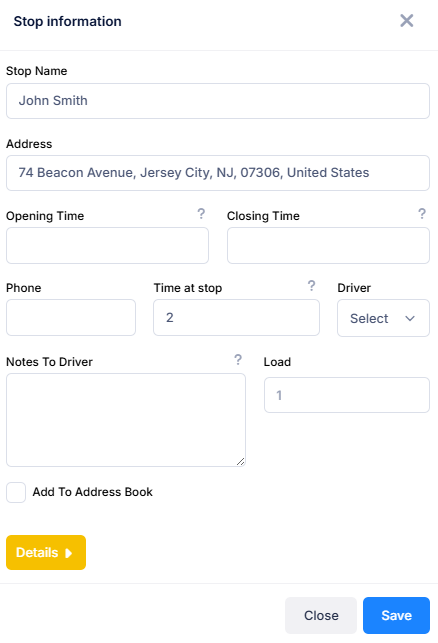
You can write the name of the student in Stop Name field. You can enter the student's parent's mobile phone number in the Phone field. This information will appear in the mobile app as the driver follows the route. This will allow the driver to call the parent if necessary.
If multiple students are boarding at a stop, there are two options. First, you can add multiple student names to the Stop Name field and add the number of students to the Load field. This method prevents separate records of students boarding and disembarking from the school bus. Alternatively, you can create a separate stop record for each student. Type the name of the student in Stop Name and 1 in the Load field. This way, even if multiple students board at the same location, the driver will provide separate approvals for each boarding student on the mobile app, and the boarding records will be kept separately.
You can add notes to the Notes to Driver field. If entered this data will be displayed in the driver mobile app, next to name of the student.
If you want to store this stop data for creating new routes like school trips, get the Add to Address Book field selected. For creating School Trip routes, see blog post on “How to optimize your fleet?”.
To upload multiple stops at once, check blog post How to Upload Multiple Stops Using Excel File?
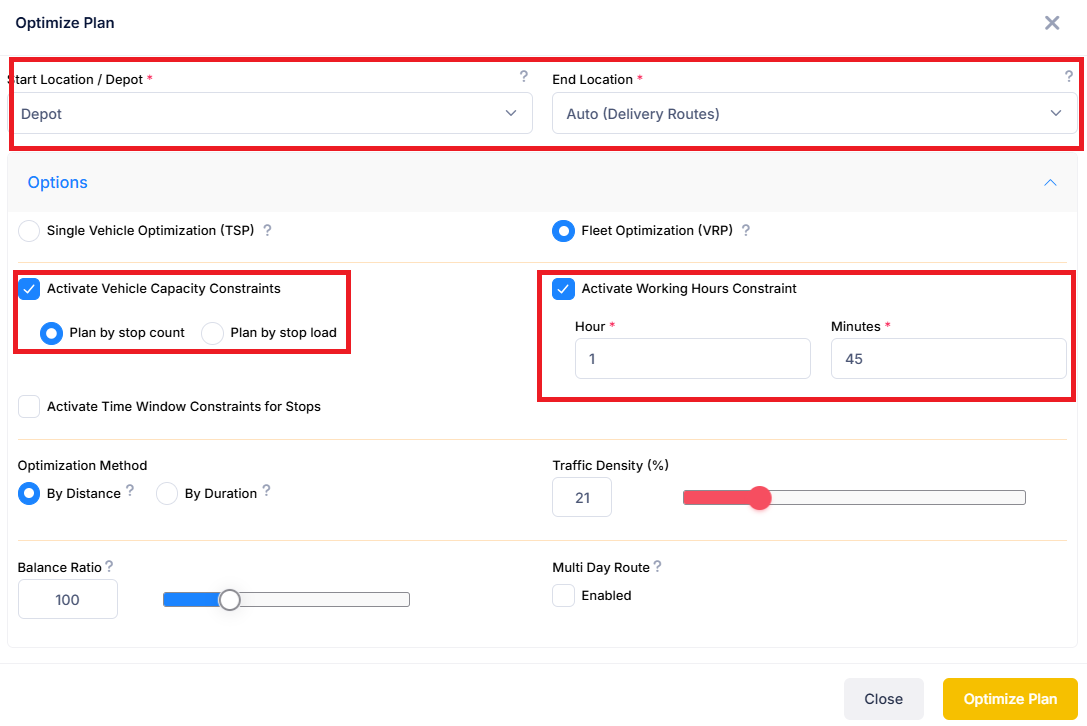
7. Click Optimize button in Planning Screen
![]()
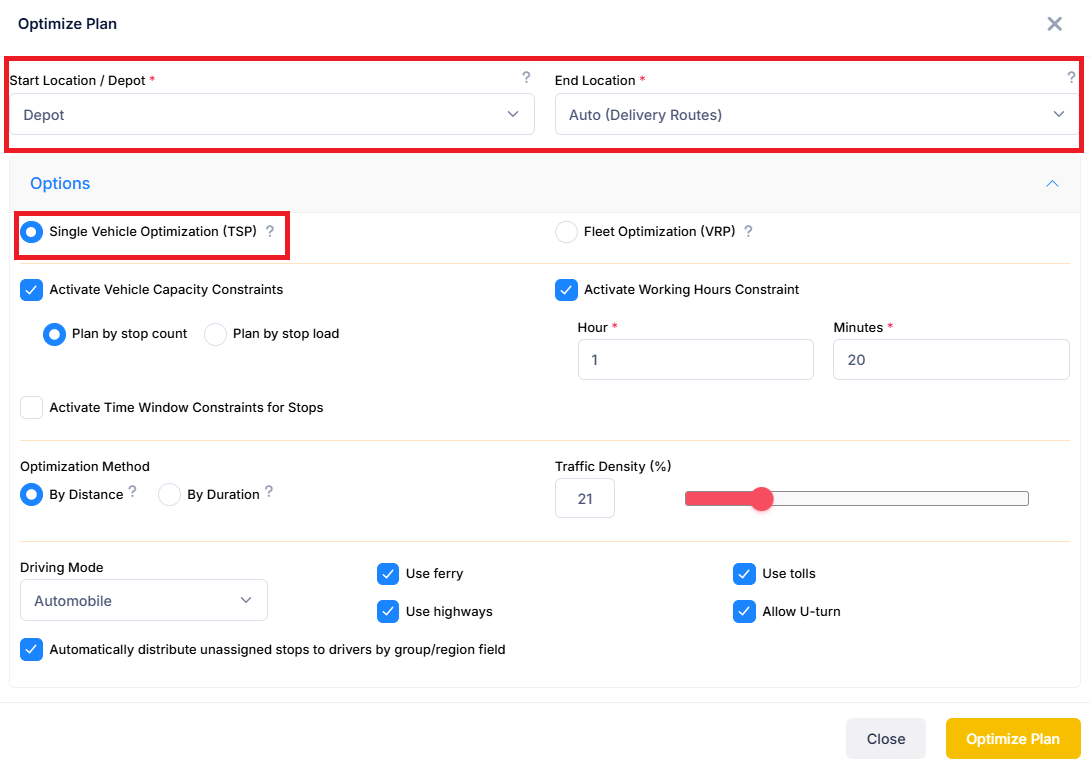
Select Start and End locations. If direction of the route is from home to school, select Start Location as Auto and End Location as Depot (School). If direction of the route is from school to home, select Start Location as Depot (School) and End Location as Auto.
Click Options button and select Fleet Optimization. Get “Activate Vehicle Capacity Constraints” field selected. If you have defined more than one student at a stop (as explained in step 5), select “Plan by stop load”. Or else if you have defined one stop for each student, select “Plan by stop count”. This option will ensure that vehicle capacities will be considered while optimizing the route.
Get the “Activate Working Hours Constraints” field selected and define working hours (or route duration) limit. (Hint: If you want routes to have a clustered look on some regions, try shortening working hours and optimizing again. If this limit is too short, some stops may be dropped from route. In this case you must increase the limit.). This option will limit the duration of the routes and ensure the vehicles to arrive at the school earlier than school opening hour (as explained in step 3).
Then click Optimize Plan button to get the result.
8.Result will be displayed on map and on stops section. Resulting routes will be sent to the drivers automatically in recurrence period. You cannot send the routes manually.

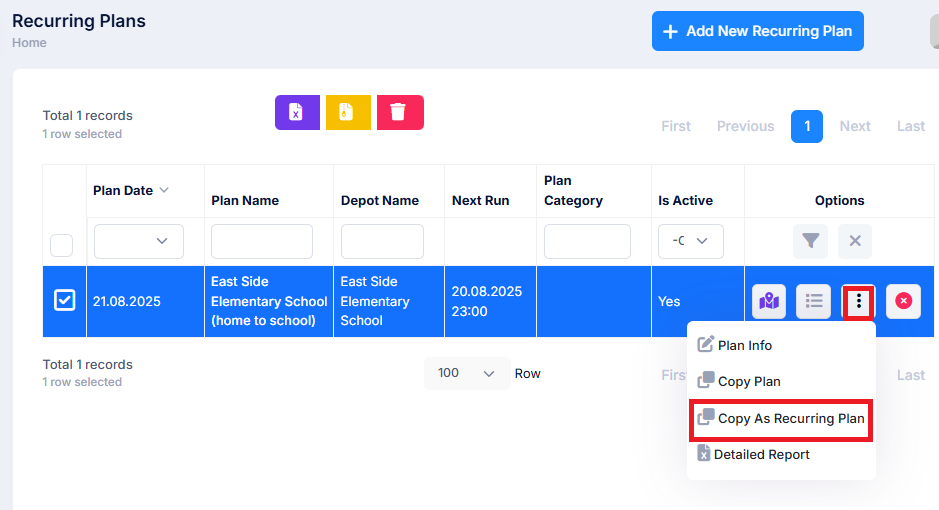
9.Following steps are optional. We will describe how to copy a recurring route to create an opposite direction (e.g. school to home) route plan. Click Recurring Plans on the left side menu.
![]()
On Recurring Plans screen click three dots menu and select Copy As Recurring Plan. Change end of name of the plan to “school to home” and change the Start Time to vehicle departure time. Click Save.
Click Optimize button in Planning Screen.
![]()
Click Options button and select Single Vehicle Optimization this time. Change the Start and End Locations to match school (Depot) to home direction. Click Optimize Plan.
In Fleet Optimization, routes are deleted and reoptimized altogether, it is possible assign students to different route from reverse direction route. In Single Vehicle optimization routes are not deleted, students stay in the vehicles which were assigned in the previous (reverse direction) optimization. So, each vehicle is optimized independently and only directions are reversed.